Session 7 - Navigation
A website with many pages should be designed in a logical fashion, and have a consistent navigation method. Each webpage should allow navigation around the site. Some pages may have links within the main part of the page directly to other pages but the navigation model will usually start off as a simple tree structure. The home page will have links to sections within the site, and each section page will have links to its own specific pages. This hierarchical model can extend down many levels, but most sites will restrict the number of level to three or four as a user can get lost with a deep tree structure. ASP.NET provides a set of controls which make it easy to build consistent navigation into your website. However, you must have a clear design first.
ASP.NET's navigation model makes use of a site map. The site map is not part of the web pages but is an XML data file which acts as a script to build the menu structures and breadcrumb trail for each page. As a site develops the site map needs to be adapted to match the design. However, the web pages will automatically provide the updated navigation functions as soon as the site map it updated. The default method is to create a text file called 'web.sitemap'. VWD will create one automatically for you if you choose File | New File… and select Site Map from the New File dialog.
The web.sitemap file is a standard XML data file with a root node called <siteMap>. Within the <siteMap> element there is a <siteMapNode> element usually
corresponding to the home page for the site. Linked pages from the home page are held as further <siteMapNode> elements inside the first. A <sitemapNode> can contain any number of other <siteMapNode> elements. If a page has links from it in its tree structure then there will be a <siteMapNode> element for each linked page. This structure maps translates to a multi-level menu structure,
which is reproduced using either a Menu or a TreeView control in .NET.
For example, the tree structure below:
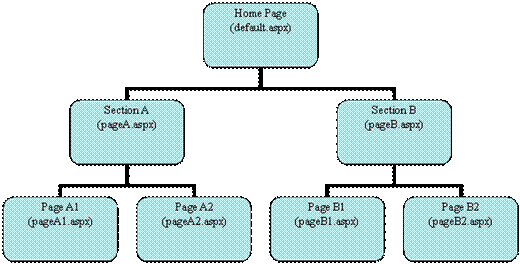
would have a web.sitemap as follows:
<?xml version="1.0" encoding="utf-8" ?>
<siteMap xmlns="http://sch   ...   eMap-File-1.0" >
  <siteMapNode url="~/default.aspx" title="Home Page" >
    <siteMapNode url="~/PageA.aspx" title="Section A" >
      <siteMapNode url="~/PageA1.aspx" title="Page A1" />
      <siteMapNode url="~/PageA2.aspx" title="Page A2" />
    </siteMapNode>
    <siteMapNode url="~/PageB.aspx" title="Section B" >
      <siteMapNode url="~/PageB1.aspx" title="Page B1" />
      <siteMapNode url="~/PageB2.aspx" title="Page B2" />
    </siteMapNode>
  </siteMapNode>
</siteMap>
Note: The bottom most pages in the tree result in empty <siteMapNode> elements. Pages higher up the tree have <siteMapNode> elements containing one <siteMapNode> element for each page linking from it.
There is no need to have a hierarchical structure for your menu, and if you do,
it does not have any direct relationship to any folder hierarchy in the site (unless
it is planned that way). A simple flat menu structure will still have a dummy root
<siteMapNode> element containing all the actual <siteMapNode>s for the
actual pages. The dummy root can be disabled by setting the appropriate properties
- we will look at this later in the tutorial.
A single level menu structure may look like this:
<?xml version="1.0" encoding="utf-8" ?>
<siteMap xmlns="http://sc   ...   eMap-File-1.0" >
  <siteMapNode url="~/" title="Dummy Link" >
    <siteMapNode url="~/Default.aspx" title="Home" />>
    <siteMapNode url="~/About.aspx" title="About" />
    <siteMapNode url="~/Products.aspx" title="Products" />
    <siteMapNode url="~/Contact.aspx" title="Contact Us" >
    <siteMapNode url="~/Links.aspx" title="Links" />
  </siteMapNode>
</siteMap>
The advantage of a single level sitemap is that it can be linked to a simple BulletedList
which can be styled using CSS. The built in navigation controls in .NET rely heavily
on tables for layout and Javascript for dynamic effects, so they are more difficult
to work with from an accessibility point of view.
Navigation Controls
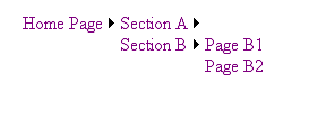
There are three navigation controls. Two can be used directly for linking to any page in the sitemap, namely Menu and TreeView. The third, SiteMapPath, provides a breadcrumb trail to indicate your position within the site.
Menu provides a navigation hierarchy in an expanding tree, for example:
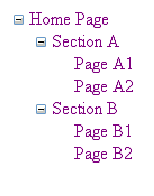
TreeView provides a vertical arrangement as a static display, although tree nodes may be expanded and collapsed. For example:
The SiteMapPath control will appear as follows if you are currently viewing PageA1.aspx:

Note that you can click on pages higher up in the page hierarchy to quickly retrace your steps through the pages you have visited (hence the term 'breadcrumbs' - from Hansel and Gretel).
Building navigation into your site - step by step
You will need a sitemap before navigation works properly. You can build your basic pages, but you will need the proper site plan to make it all work.
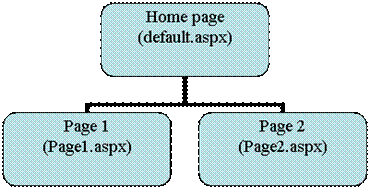
For the purpose of this exercise you will have a homepage linking to two other pages (Page1.aspx and Page2.aspx). The structure is as follows:
- Create a new C# ASP.NET Website called Navigation.
- Choose File | New File…
- From the Add New Item dialog box choose Site Map, leave the filename (web.sitemap) unchanged and click Add.
- You will get a new file with the following content:
<?xml version="1.0" encoding="utf-8" ?>
<siteMap xmlns="http://sc    ...      teMap-File-1.0" >
    <siteMapNode url="" title="" description="" roles="">
        <siteMapNode url="" title=""  description="" roles="" />
        <siteMapNode url="" title=""  description="" roles="" />
    </siteMapNode>
</siteMap>
- Amend the file to contain your page details, as follows:
<?xml version="1.0" encoding="utf-8" ?>
<siteMap xmlns="http://schem   ...   p-File-1.0" >
    <siteMapNode url="~/default.aspx" title="Home Page" >
        <siteMapNode url="~/Page1.aspx" title="Page 1" />
        <siteMapNode url="~/Page2.aspx" title="Page 2" />
    </siteMapNode>
</siteMap>
Note: the description and roles features in the sitemap are not being used in this example. - Drop a TreeView control onto your web page. Use the SmartTag popup to add a SiteMapDataSource onto your page, and configure the TreeView to use it. No properties need to be set as the default web.sitemap will be used automatically.
- Drop a SiteMapPath control onto your web page.
- Use File | Add New to add two new web pages called Page1.aspx and Page2.aspx
- Repeat steps 6 and 7 for both of the new pages.
- Customise your home page and the content pages with the own content.
- Save your project and run it.
Download a
ZIP version of simple Navigate.
Session 7 - Workshop
- Reproduce the above example for yourself.
- Build a simple Contacts application using the database from the previous workshop.
You can have a home page, a browse contacts page, an edit contacts page and an email
contact page. Build a menu structure for this and incorporate it into the pages,
using one of the navigation controls.